
Night Photography 101: A Beginner's Guide to Shooting the Stars
Here is a quick rundown of everything I wish I knew about night photography before trying it for the first time!
Night photography is one of my favorite types of photography. I find it the most challenging and the most rewarding. It requires me to brave the elements, forgo a proper night of sleep, and face my fears of scary unknown noises in the great outdoors past sundown. The first time I tried night photography was a frustrating experience. I hadn't properly researched it and I was utterly unprepared. Since then I have improved but there are still nights I go out and spend hours shooting only to return home with one mediocre shot. Night photography is not easy and it requires standing outside in the dark, usually uncomfortably cold, but to me, it's worth it.
One of the most common photography-related questions I get is about the settings for my night photos so I decided to put together a quick tutorial of things I have learned in the past year and a half of taking night photos. This is by no means the be-all, end-all of night photography tutorials, but it is a great starting point for anyone interested in photographing the night skies.
Necessities:
- DSLR camera (preferably a full-frame, I use a Canon 6d)
- A fast, wide angle lens (24mm or wider, I use the Rokinon 14mm f/2.8)
- Tripod (I use the Fotopro C5i)
- Shutter release remote (I use the Neewer LCD Shutter Release)
- Star map and compass or an app like PhotoPills
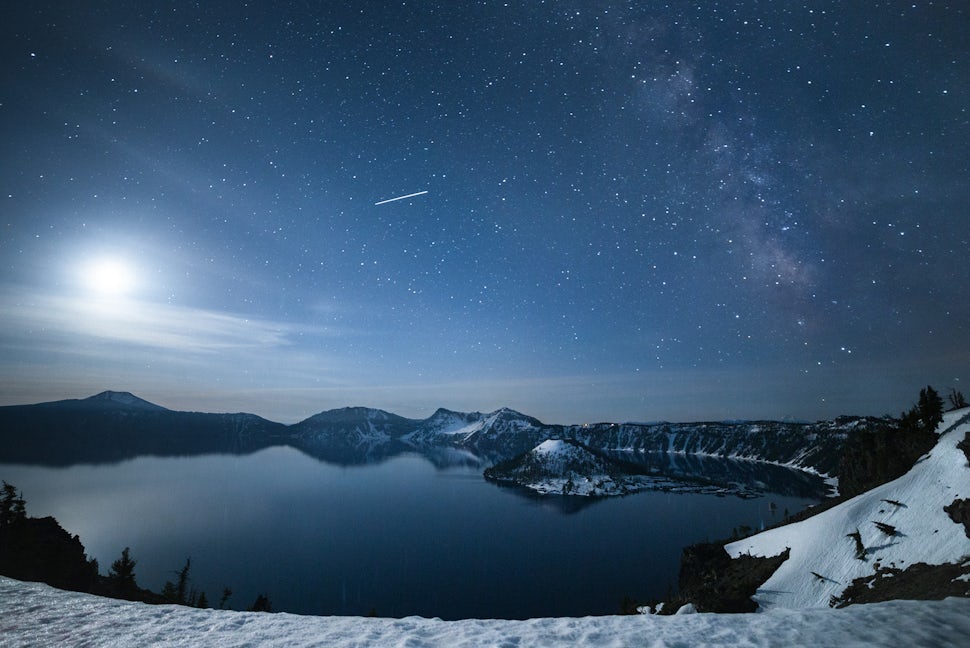
 f/2.8, ISO 1250, 25". Crater Lake National Park, 5/29/16, 3:00am.
Step 1: Research your destination.
Decide where you want to shoot well before sundown. You don't want to waste a night by aimlessly driving around hoping you find a place that suddenly speaks to you. Believe me, I've done it. Instead, decide what kind of shot you are hoping to capture and pull up a topographical map and begin planning your shot. If you want to capture star trails centered around Polaris you will have to face your camera due north. So if you have a specific landmark in mind for your foreground you will have to make sure you are south of it. Alternatively, if you are hoping to capture the Galactic Center of the Milky Way you will have to point your camera towards the south as the Milky Way traverses the southern sky. To plan my night photos I use the app PhotoPills to help determine where in the sky the Milky Way will be at any given time. It is $9.99 but it is an extremely helpful app. I don't think I've shot the night sky once without using it.
 f/2.8, ISO 3200, 25", Old Faithful, Yellowstone National Park, 7/3/16, 1:00am.
Step 2: Get your preliminary camera settings dialed in before you head outside.
Before I even step foot outside I get my camera set up on my go-to night settings. This prevents wasting precious time fumbling around outside in the dark trying to get set up. Depending on if I am shooting a dark night sky or a night sky illuminated by a full moon I have two go-to settings that I automatically use and then after a few test shots, will tweak. Before I tell you these settings I will briefly explain all the settings that affect how a photo turns out.
Aperture: Aperture refers to the diameter of the hole in your lens through which light travels into your camera. The size of this opening can be narrower or wider and this determines how much light enters your camera and hits the camera sensor. Think of aperture as your pupils. The wider your pupils are the more light will enter your eyes, the more narrow your pupils the less light enters. Similar to how your pupils will get very large in low-light conditions, your camera's aperture will also need to be very wide in order to allow as much light in as possible. This is why fast lenses are recommended for night photography. A fast lens is any lens that has a maximum aperture of 2.8 or wider.
Shutter Speed: The shutter speed determines how long the shutter will be open, and thus determines how much time the camera will spend gathering light. Generally in night photography you want the sensor to gather as much light as possible, however when shooting stars there is one limitation: the stars move. Or more accurately the earth moves, but when the shutter is open for longer than 20-30" (depending on your lens' focal length, wider lenses will be able to stay open longer) you will begin to get star trails. Star trails can be great if that is the effect you are going for, but if you want a static night scene it's best to leave the shutter open for 15-20".
 f/2.8, ISO 640, 936", Trillium Lake, Mt. Hood National Forest, 5/28/16, 11:00pm.
ISO: ISO measures the camera's sensitivity to light and it has the most impact on image quality. A camera will produce its highest quality images at its lowest ISO (for my camera that is 100, it may be more or less depending on your camera make), but night photography requires you to raise the ISO substantially in order to have enough sensitivity to gather the light in the scene. This is why it is beneficial to have a camera with a large sensor, such as a full frame version from Canon, Sony, or Nikon. Their large sensors allow you to use higher ISOs without the image quality suffering too much.
 f/4, ISO 1250, 8", Overlooking Lower Blue Lake, Mt. Sneffels Wilderness, 10/14/16, 2:00am.
White balance: Ideally the white balance will be set so that things that are a true white in real life will appear a true white in your photo. To do this you must take into account the color cast of the light source illuminating your scene (is it cool like an overcast day or warm like a candlelight?) and adjust accordingly. This one adjustment can completely change the mood of your photo. Without getting into the nitty gritty technical explanation of Kelvin (if you are interested in learning the nitty gritty, Fstoppers has a really informative write-up here), a lower Kelvin temperature than is ideal for your scene will make your photos bluer, while a higher Kelvin temperature than is ideal for your scene will give your photo an orange glow. This setting can be more subjective for night photos. I typically set my white balance for night photos to the tungsten setting which is around 3,200K because I prefer my night photos to be bluer. Night scenes tend to look blue to my eyes and I want my photos to represent what my eyes see. I've heard some people say that they use the daylight white balance (5,500K) because the stars and moon are giving off the same light as the sun but I generally haven't been able to use the daylight white balance without having a completely orange sky. However I have found one exception, and that is when there is a bright, full moon.
Below is an example of how temperature can drastically affect the mood of the photo. The image on the below left has a temperature of 3545K, while the image on the right has a temperature of 4000K. The left photo feels cold and wintry, which is the reality of the scene (it was 8°F!!) and thus it is the version of the photo I prefer.
 f/2.8, ISO 800, 481", Tunnel View, Yosemite National Park, 2/4/16.
MY STARTING SETTINGS
Dark night sky: f/2.8, ISO 3200, 25", WB: Tungsten.
Sky illuminated by a bright moon: f/2.8, ISO 800, 10", WB: Daylight.
 f/2.8, ISO 3200, 30", Lone Eagle Peak, Indian Peaks Wilderness, 9/6/15, ~1:00am.
Step 3: Set up your tripod and take a few test shots.
Once you are at your desired destination and you have your camera settings dialed in, set up your tripod and take a few test shots. You will be able to then see any adjustments you need to make. Perhaps you change your composition, maybe lower the shutter speed, or raise the ISO. You will also be able to set your focus at this point. You will have to use manual focus when taking night photos. Generally if you focus to infinity that will ensure that everything in your scene is in focus. It is also possible to check the focus by using the back display and zooming in on a bright star or silhouette and adjusting the focus based on that.
 f/2.8, ISO 640, 13", Mirror Lake, Mt. Hood National Forest, 5/28/16, 10:30pm.
Step 4: Shoot away!
Have fun! Move around, change your composition, try shooting photos with a person in the scene, or a tent! Experimenting is one of the greatest things about photography!
When shooting I recommend using a shutter release or the 2 or 10-second timer built into your camera. Getting sharp images at night is already a challenge, you don't want to make it even harder for yourself by introducing camera shake into the mix! Using the shutter release means your camera will be completely still when the shutter opens and closes, removing any possibility of camera shake.
 f/2.8, ISO 5000, 30", Great Sand Dunes National Park, 3/8/16, 2:30am.
Step 5: Import the photos to your computer and edit them.
 f/2.8, ISO 6400, 20", Diamond Lake, Oregon, 5/29/16, 12:00am. Unedited.
 Edited.
All photos need to be edited, especially if they are taken in RAW (they always should be!), and especially if they are night photos. Everyone has their own editing style; I prefer my photos to look as close as possible to the scene that I remember in my mind's eye. However, night photos are a little different because our eyes aren't nearly as sensitive as our camera sensors. You can see the unedited and edited versions of the scene at Diamond Lake above. Here are the adjustments I made for the edited version in Lightroom and Photoshop:
- Cropped photo so Mt. Thielsen was centered horizontally and filled lower third of frame
- Enabled lens correction because the 14mm Rokinon has noticeable distortion, especially when a horizon is prominent in the image
- Changed temperature to 3475 and increased purple tint to 26
- Overall adjustments: Increased whites, shadows, highlights
- Applied noise reduction
- Painted on sky: Increased contrast, highlights
- Opened photo in Photoshop and removed a small tree branch in upper right corner (in retrospect I should have taken care of this as I was taking the photo but I didn't notice it)
I hope you find this guide helpful when setting out to photograph the night sky!
We want to acknowledge and thank the past, present, and future generations of all Native Nations and Indigenous Peoples whose ancestral lands we travel, explore, and play on. Always practice Leave No Trace ethics on your adventures and follow local regulations. Please explore responsibly!
Do you love the outdoors?
Yep, us too. That's why we send you the best local adventures, stories, and expert advice, right to your inbox.


