
5 Tips For Capturing The Northern Lights
Get the photos that do this natural phenomenon justice.
There's no doubt about it, the Northern Lights are magical. Experiencing the aurora borealis is something that should be on everyone's bucket list. You know the old internet saying though...pics or it didn't happen.
Taking photos of the Northern Lights can be a little complicated, but it doesn't have to be difficult. All you need is a little preparation, a few pieces of gear, and patience. Here are a few tips to get you started.
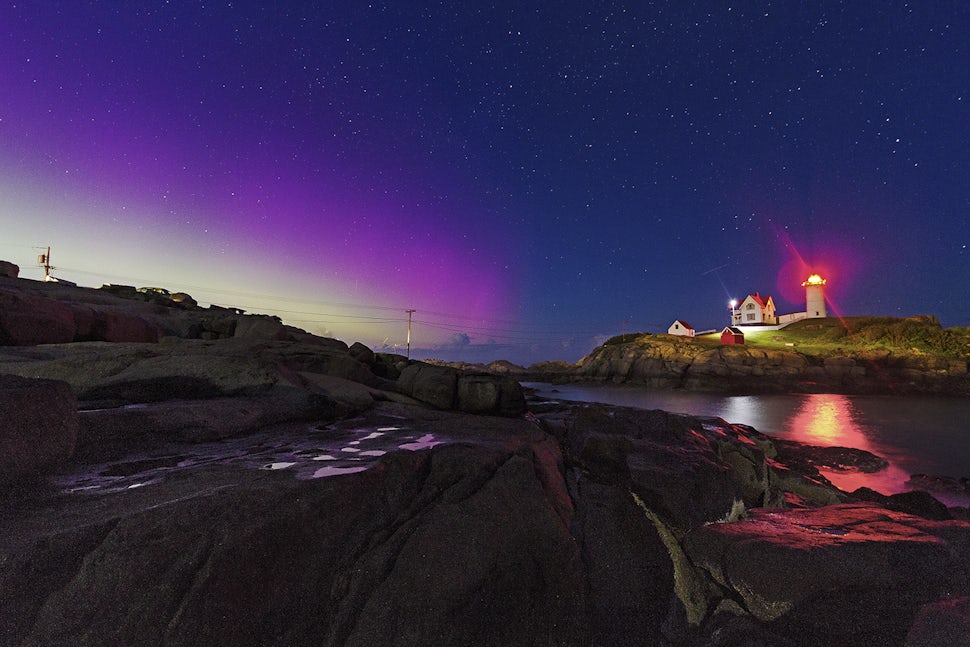
Nubble Lighthouse, Maine

1. Plan ahead
Check the weather forecast for clear skies: It’s difficult to see the northern lights if the sky is completely covered by clouds, so relatively clear skies are important. A little cloud cover with some wind is ok - the clouds blowing across the sky could add something to your shot.
Research dark sky areas around you: Ambient light from nearby cities won't ruin your aurora images, but they will interfere. Try to get as far from the city as possible.
Watch for aurora activity: Auroras are a direct result of solar storm activity, and just like most natural phenomenon, they can be predicted. The strength of the light show is measured in KP: the higher the kp number, the farther south you’ll see the show. Time of year and your location matter too - check out this site for up to date info on Aurora forecasts.
Grotta Lighthouse, Iceland

2. Get the gear
Tripod: A solid place to rest the camera is a must for long exposure shots.
Remote release or timer: A solid tripod can be undone by camera shake. If your camera has the ability to lock the mirror, do it. If your camera has vibration reduction, turn it off to avoid feedback loops. Most importantly, if you can avoid the camera shake you introduce when you press the button, do it. You can use a remote, a cable release, or the camera’s self timer to reduce the chances of movement in the final image.
Manual mode: This will give you the ability to adjust the settings to accurately expose this sort of tricky scene, without pushing the ISO higher than you need to
Batteries: Since most aurora activity is far north, and during the colder months, you have to expect anywhere from chilly to downright freezing conditions, and that will drain your batteries quickly. Bring as many as you can get your hands on, and keep them in an interior pocket where your body heat can keep them warm
Warm clothes: Because BRRRRRRRRRRRRRR. See above. Dress appropriately for the weather!
Flashlight: Working at night means you need to bring some light with you to…you know…not fall off cliff edges and stuff. Unless you plan on light painting, make sure to turn your light off during the actual exposure though. The stray light from your torch might accidentally ruin your image
Take filters off: Even your UV filter! This will help avoid artefact and aberrations in the final image.
White Mountains National Recreation Area, Alaska

3. Focus
Infinity Many lenses have an infinity marking on the focus ring, to indicate the focusing point for “super far away”…that includes stars and lights in the sky. If you want to have sharp stars, the infinity setting (or close to it) is where you want to set your camera
Focus on something bright, far off in the scene: This is a decent alternative to trying to focus on the stars. In the case of my lighthouse image, the contrast between the dark sky and the bright light made it easy to ensure sharp focus for the scene. In a pinch, a bright flashlight can be placed far out in the scene, use it to manually focus, then go grab it before you press the shutter.
Live view: If you struggle to focus through the view finder, and you have a “live view” feature (meaning the screen on the back of some cameras), it might be easier to use it to focus. I normally switch to live view for my night photography outings. As a word of warning though, it will also drain the battery, so I don’t leave it on the whole time. I just use it to manually focus, then turn it off.
Preset the focus: If you have the time, get to your scene early, before the sun sets and focus the scene. Then you don’t have to worry about struggling with the focus ring in the dark.
Liberty Bell, Washington

4. Settings
RAW This is an uncompressed file (versus jpg’s, which are compressed) so you have more data to edit in the end. Always shoot RAW if you can.
Wide aperture: The goal is to let in as much light as possible, since you are photographing a dark scene. The wider the aperture (aka the lower the f/number), the wider the opening through which light can hit the camera sensor. The downside is that wider apertures have a shallower depth of field, which makes them hard to find your focus in low light. You have to find a happy medium between wide enough to let light in, and not too wide so you can focus the image. I find anything under f/2.8 difficult to focus at night and anything higher f/5.6 doesn’t let enough light in.
Time value / shutter speed: This is the second part of the settings equation. Your aperture setting and your shutter speed directly affect how much light enters the camera. To determine your shutter speed, you need to factor in the overall exposure, how fast the aurora is moving, and if you want star trails. The longer the shutter is open, the more movement you capture…which means if you leave the shutter open too long, you’ll get star trails in the sky and the details of the aurora might be blurred. If you want sharp stars and more details, do a test shot between 15 and 30 seconds long. Adjust your setting from there.
ISO: This setting controls how quickly your camera sensor absorbs light. The higher the number, the more light it will collect. The downside is that the image quality degrades, because higher ISO will introduce noise to the image. In my opinion, this is the last setting to change, so you can keep it as low as possible and retain image quality. A good test shot range is probably between 800 and 1600 ISO. Adjust from there.
Watch the histogram: sometimes your eyes have a hard time adjusting between the dark sky and the bright LCD screen on the camera, so you may be tricked into thinking something exposed well. If you know how to read your image’s histogram, though, there is no confusion!
5. Find an interesting foreground
This is the part of northern lights images that most people get tripped up on. The lights are very enchanting, and it’s easy to get caught up in what they are doing within the scene. Generally speaking though, the sky alone is not a strong enough primary subject for a landscape image. Adding interesting foreground elements will help round out your final image and give it a wow factor.
Saskatoon Island Provincial Park, Alberta

We want to acknowledge and thank the past, present, and future generations of all Native Nations and Indigenous Peoples whose ancestral lands we travel, explore, and play on. Always practice Leave No Trace ethics on your adventures and follow local regulations. Please explore responsibly!
Do you love the outdoors?
Yep, us too. That's why we send you the best local adventures, stories, and expert advice, right to your inbox.


