
7 Tips For Incredible Night Photography
Like most things in life, it takes practice, patience, and a few good strong cups of coffee.
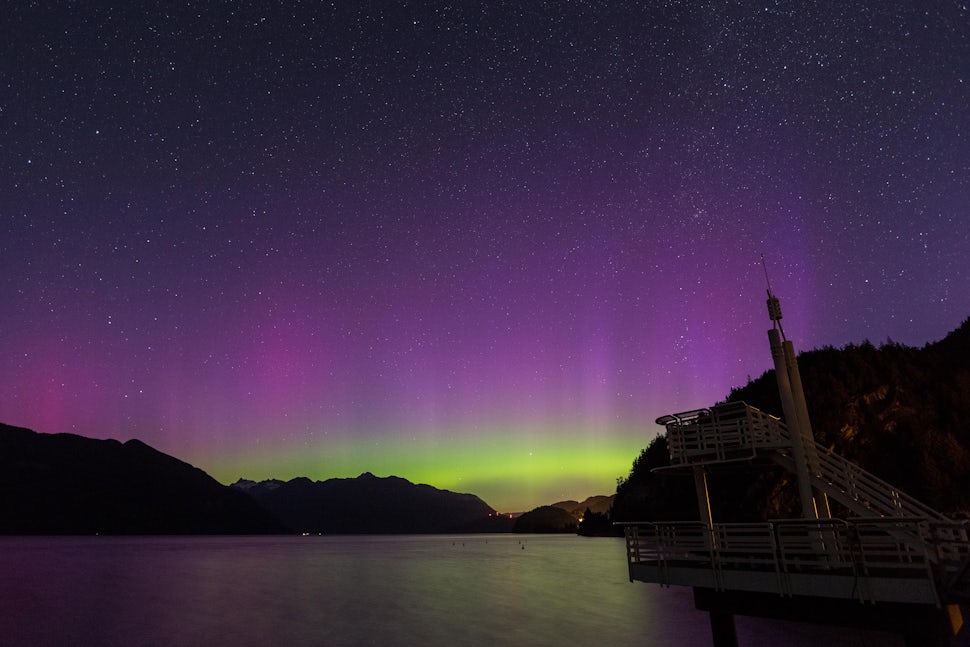
I personally love nothing more than spending a night under the stars and shooting night photography in the middle of nowhere. It really can be an amazing experience. Night photography can be an amazing way to capture things that are hard to see with the naked eye such as the stars, the aurora, and light trails.
Although shooting at night sounds like a daunting task it really isn’t. Like most things in life, it just takes a little bit of practice, a bit of patience, and a few good strong cups of coffee to keep you awake. Here are some tips to help you along the way.

1. Get the right gear
Having the right gear while shooting night photography is pretty important. You will need a camera (of course) and a tripod or a sturdy even surface to place your camera where it will not move at all. A wide angle lens is a great tool to have as you will get more of the sky/scenery in the shot, however it’s not 100% necessary. A shutter release will allow you to shoot without having to physically touch your camera which will help maximize the sharpness of your shot. If you don’t have a shutter release (or forgot to pack it), you can set the self timer function set to 10 seconds.
2. Shoot in RAW
While I generally shoot my time lapses in .jpg to save me from editing hundreds of pictures later on, I always shoot my single frame shots in RAW. Shooting in RAW will allow you to produce higher quality images as well as easily recover shadows, fix over/under exposed images, adjust the white balance and correct other issues with the photo. Keep in mind when you shoot in RAW you will need to use a post processing application like Lightroom or Photoshop to edit your photos.

3. Shutter speed
Shutter speeds for night photography are a major deal breaker. Too slow of a shutter will cause stars to blur, and not long enough will cause you to miss out on finer details. The shutter speed will depend on what you are shooting, but general rule of thumb for star photos is 20 seconds. That will give you great detail in your exposure and will stop the any motion blur on the stars. When in doubt, follow the 500 Rule. 500 divided by your focal length = your longest exposure in seconds.
4. Use mirror lockup
Even the slightest vibration when you are shooting a long exposure can ruin your shot. Changing your camera to "mirror lockup" will help ensure that any vibrations from the mirror have dissipated before the shutter is pressed. This will help add sharpness to your shots, and let’s face it, who doesn’t want a nice crisp shot?
5. Manual focus with infinity focus
It can be very tough to use auto-focus at night because the metering of the image is so dark. The easiest way to focus is to use the live view feature. If you are in a very dark area and can’t focus on anything, turn up your ISO to the highest setting, have someone stand several meters away from you with a flashlight and using them as your focal point. Use your little magnifying glass button on the live focus to zoom into the flashlight and adjust your focus. Make sure not to bump your focus once it’s set, turn down your ISO, and take a test shot.

6. ISO settings
The higher the ISO the more noise that will be added into your shot. As with all shots, the lower the ISO the better the quality of image, but it can be tough when it’s pitch black outside. In order to keep your shutter speed below 20 seconds, you will most likely need to increase your ISO too. When I am shooting stars I usually start my ISO at 1600 (and adjust from there) but this will depend on which brand of camera you shoot with as well as if it’s a full frame or a crop frame.
7. Scout your location in the daylight if possible
If you have the luxury of visiting the area before dark, it will help you get an idea of the lay of the land and also help compose a compelling shot. The same rules of composition apply to night shots so a good strong foreground will help make the shot more interesting. It’s also a great way to manually adjust your focus as you will be able to see a clear image of what you are focusing on. This will save you some time once it becomes dark.

We want to acknowledge and thank the past, present, and future generations of all Native Nations and Indigenous Peoples whose ancestral lands we travel, explore, and play on. Always practice Leave No Trace ethics on your adventures and follow local regulations. Please explore responsibly!
Do you love the outdoors?
Yep, us too. That's why we send you the best local adventures, stories, and expert advice, right to your inbox.


