
How To Get Great Winter Photos At Emerald Lake
Emerald Lake in Rocky Mountain National Park is a photographic gem in all seasons but especially during the winter. In this article I've got tips for how to get awesome winter shots of this iconic lake.
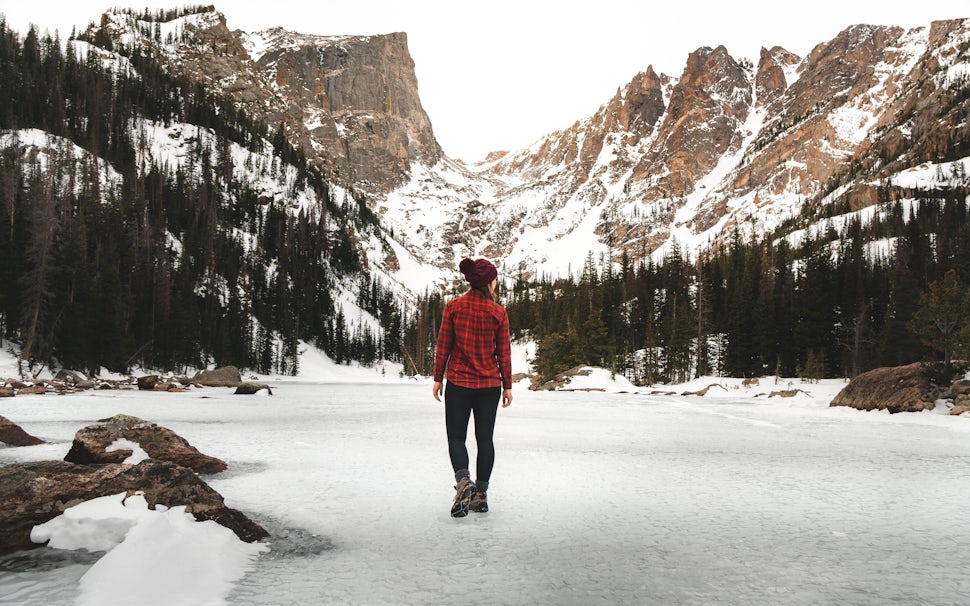
Winter is one of the best seasons for outdoor photography. There are less crowds, you don't have to get up quite as early for sunrise, and fresh snow makes a landscape so serene. Emerald Lake trail in Rocky Mountain National Park is one of the most popular trails in the park because of its stunning views of Flattop Mountain and Hallett Peak. Coming here during the winter is a fantastic time for photographers of all skill levels to capture this iconic imagery in a new light.

Camera Gear Recommendations
To get the most out of this photographing this area, I would recommend a camera with exchangeable lenses. Mirrorless or DSLR cameras will produce great results. Having a few different lens options will give you a range of focal lengths to capture the towering peaks above Emerald Lake, and detail shots of the ice that are only available during the winter. A wide angle, mid range zoom (such as a 24-70mm) or a prime lens (in the 50-85mm range) would be excellent options to consider. I'd also highly recommend bringing along a tripod to help you keep consistent framing and slow the shutter down if needed. A polarizing filter is a helpful, though not necessary, addition that can be great for winter lake conditions. These filters help reduce the glare from the sun on reflective surfaces and bring out deeper blues in the skies. You can certainly use a camera phone as well to get some great images too. If you shoot RAW images through apps like Lightroom or VSCOcam on your phone, you'll have more editing flexibility later.
This is the kit I used for the images in this story:
-Camera body: Sony A7rii
-Lenses: Sony Zeiss 16-70 f4 and Sony 50mm f1.8
-Polarizing and UV filters
-Tripod
General gear tips for RMNP in winter
To photograph Emerald Lake during the winter, be prepared to be hiking on snow and ice. I'd recommend getting YakTrax for your hiking boots or renting snowshoes, depending on the snow conditions. Also be sure to check the weather before doing this trek. It can get very windy at RMNP, which can bring the temperature down a lot. Packing extra foot and hand warmers is an excellent idea.
Camera Settings and Techniques
Depending on your comfort with your camera settings, shooting in either full manual mode or Aperture Priority will give you the control you need. The weather at RMNP and time of day you are shooting will determine the light quality and visibility at Emerald Lake. In Aperture Priority your camera will manage your ISO and shutter speed, allowing you to control depth of field. An aperture in the range of f6 to f11 will ensure that the majority of the landscape is sharp and in focus. As with many outdoor shoots, I find that going first thing in the morning is usually best. The winds are often calmest in the morning, there are fewer people on the trail, and the lighting can be fantastic. A technique that I found very helpful for a frozen Emerald Lake is to do Focus Stacking. This is where you take a few images with same framing but change the focus point of each capture. You can combine them in post processing to ensure a really crisp shot through the entire image. The image below is a stack of three captures I took that were then combined for this final result.

Getting Unique Images
Since Emerald Lake is one of the most popular hikes in RMNP, it's also one of the most photographed. There are numerous ways you can approach capturing this scenery during winter. Look for different vantage points to give you unique perspectives. While following the trail, take some time to survey the surroundings to find spots that appealing to your eye (while adhering to park regulations and staying on approved pathways). Try getting to higher ground. See what elements you can include in the foreground.Consider how your main subject will be emphasized in the composition. If you are on the frozen lakes at either Dream or Emerald Lake, positioning your camera low to the ground is a great way to capture the scale of the scene! Consider detail shots as a way to complement your wider landscapes images. Taking the extra time to find those uncommon perspectives will give you memorable and unique shots of this well photographed area.


For any curious photographers, here are the settings on the images used in this story:
Cover image: 20mm | f5 | 1/320 sec | ISO 400
First image: 16mm | f9 | 1/125 sec | ISO 250
Second image: 20mm | f6.3 | 1/200 sec | ISO 400 (3 images stacked)
Third image: 50mm | f5.6 | 1/320 sec | ISO 250
Fourth image: 50mm | f5 |1/200 sec | ISO 400
Note that the tips and suggestions in this article are just based on my personal experiences. I'm on a photography journey to improve and grow as well. If you have any additional tips or photos to share for developing photographers like myself, please drop them in the comments. Safe adventures friends!
We want to acknowledge and thank the past, present, and future generations of all Native Nations and Indigenous Peoples whose ancestral lands we travel, explore, and play on. Always practice Leave No Trace ethics on your adventures and follow local regulations. Please explore responsibly!
Do you love the outdoors?
Yep, us too. That's why we send you the best local adventures, stories, and expert advice, right to your inbox.


