
The Start to Finish Guide to Photographing and Post-Processing the Milky Way
We have all seen amazing images of the Milky Way, but with so much to learn, you've never really taken the time to learn it. Read my guide to learn everything you need to know to produce some amazing images!
The Gear:
Step one is getting the right gear to be prepared to produce some amazing images.
Camera Body:
First of all, lets start off by talking about cameras. You will want a DSLR, and something that can handle high ISO's well. A full frame camera generally works best, but any DSLR will work. If you have one that does not handle noise well, you can still photograph the Milky Way, it will just take some more effort post processing. I personally use a Canon 6D, which works excellent in low light. Generally, the more money you spend, the better your camera will be at low light. However, as I stated before, any DSLR will work.
Lenses:
Having the correct lens is just as important as having a good camera. In general, the best lenses are ultra-wide angle, meaning they range from 14mm-20mm. The wider the lens, the longer you will be able to expose the image for, and therefore the stars will be brighter (more on this later). Another important thing to have on your lens is a very wide aperture. The wide aperture will allow you to bring in more light to the cameras sensor. I personally like the Rokinon 14mm, f/2.8 lens. This lens produces sharp results and is very easy to use. Any lens will work to photograph the Milky Way, but an ultra-wide angle with a wide aperture will produce the best results.
Tripod:
Shooting off 20-30 second exposures will require a tripod, or something to hold your camera perfectly still. Really, any tripod works, just make sure that it is stable so that you do not drop your camera in the dark. I use a MeFOTO Backpacker, which folds up and is compact and light.
The Shoot:
Now that you have all the gear, you need to know how to find a spot to shoot the Milky Way and how to use all of your gear.
Finding a Location:
You can't see the Milky Way in a place with lots of light. If you live in a city, you will most likely have to travel at least two hours to find a dark sky. To find places where the sky is dark, I like to use a Dark Sky Finder. Keep in mind, you can't just pinpoint a spot where it is dark and go there. You will want to plan out a location. My favorite places are ones where I can catch the Milky Way behind a mountain. But wait, the Milky Way might not face the right direction to frame your shot the way you want from a particular location. PhotoPills is an amazing app that tells you exactly where the Milky Way will be and at what time it rises and sets. This app is $10, but it is essential to shooting the Milky Way. After all of this planning, you can move on to the fun part of shooting the night sky!
Capturing the Milky Way:
Once you reach your location, you will want to get everything set up. Stick your camera on the tripod, and the first thing you should do is find your focus on the stars and then switch to manual focus. Since it will be dark, it will be difficult to focus on the stars. Even if your lens has infinity focus, this is not the true infinity focus. You will have to turn the focus back a bit to find the real infinity. You can find the focus by either guessing and checking, or by looking at the stars on the screen of your camera, zooming in on a very bright star, and then auto focusing on that.
After the camera is in focus, you are set to shoot! You need to make sure that you do not expose the photo for too long, or else the stars will be blurry and trailing. This is because the earth is always moving, so the stars move slowly as well. To find the maximum exposure time, divide 500 by the focal length on your lens. For my Rokinon 14mm, that would be 500/14=36. This means that I can keep the shutter open for 36 seconds before I experience trailing. I usually round this down to 30, just to be safe. After you do this quick math for your lens, move on to the next step.
Once your camera is set up and your shot is framed, open the aperture as far as you can. On my Rokinon Lens, that is f/2.8. Some lenses open even more than that. Now, you will have to crank up the ISO in order to see the Milky Way. My 6D handles noise very well, so I usually do 6400 ISO. On a camera that doesn't handle noise as well, I recommend 1600 or 3200. If you review the images and aren't getting the results you want, feel free to turn up the ISO and we can reduce the noise later.
Shoot as many different compositions as you'd like, just make sure to be watching the time before the Milky Way sets. Make sure to shoot the same exact exposure anywhere between 3-8 times, and be sure to shoot in RAW. We will stack these images later to reduce the noise. Also, be sure to turn down the monitor brightness on your camera, otherwise the pictures will seem a lot brighter than they really are. After you have a good amount of shots, it's time to head home and edit!
Post Processing:
The pictures aren't going to edit themselves!
BEFORE:

AFTER:

Programs:
- Lightroom: I use Lightroom to do any minor edits, such as exposure, before I stack the images.
- StarryLandscapeStacker (Mac only): I stack my images here, which significantly reduces noise.
- Photoshop: I use Photoshop to run actions and edit my image.
Lightroom:
Step one is to import the images in to Lightroom. Hopefully, you paid attention before and took 3-8 of the same picture with the same settings. Choose one of these sets and if you want to edit it at all, go ahead. I usually don't unless they are dark, but if you do, be sure to apply the same exact edit to each. After you are done, be sure to export them as a .TIFF file.
StarryLandscapeStacker:
Since the stars would trail if you directly stacked the images in photoshop, we have this awesome app for your computer that will detect the sky from the ground, and it will stack the image but average the stars to get pinpoint stars, rather than trails. After you run this program, export the image.
Photoshop:
Lastly, open the image in Photoshop. This is where we will do most of our work. You could just adjust sliders and dodge and burn your image, but if you really want to produce something that will have people amazed, I recommend buying some actions. This will make it very easy to edit your image and make it look great. I personally like the Dave Morrow Actions, which can be purchased for $25. These actions will walk you through everything you need to produce an amazing image, and the work on your end is minimal. After you run through these actions, you will have an image that will impress.
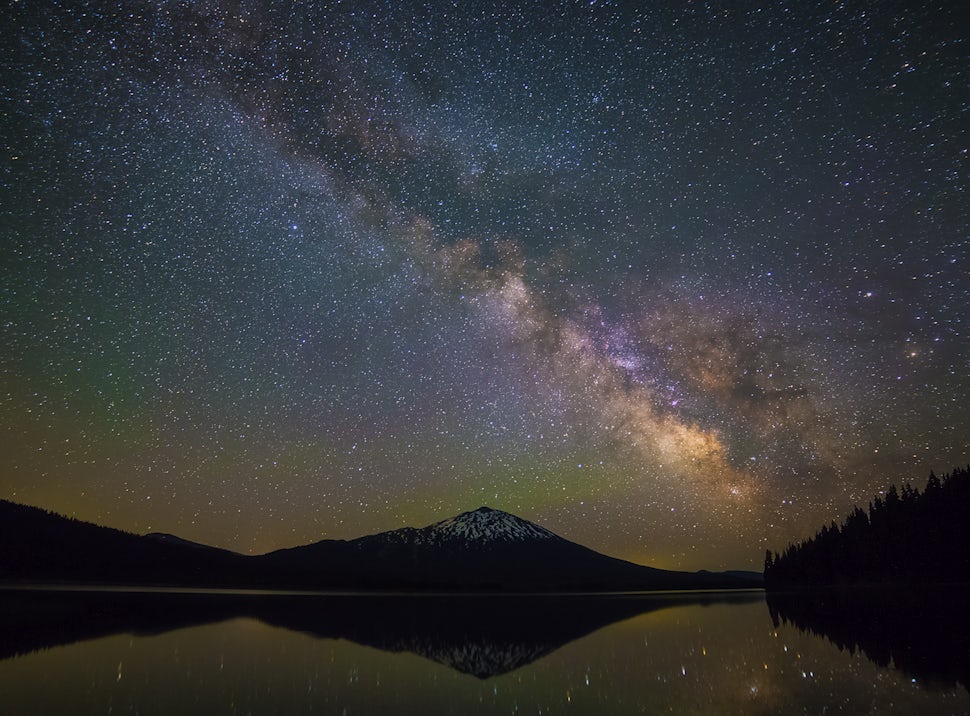
Hopefully this guide helps you shoot the night sky effectively! If you have any questions, feel free to leave a comment or find me on social media and ask me there! I will leave a few of my favorite Milky Way images below!


We want to acknowledge and thank the past, present, and future generations of all Native Nations and Indigenous Peoples whose ancestral lands we travel, explore, and play on. Always practice Leave No Trace ethics on your adventures and follow local regulations. Please explore responsibly!
Do you love the outdoors?
Yep, us too. That's why we send you the best local adventures, stories, and expert advice, right to your inbox.


