
Cowboy Coffee: How to Make It Right (Step-by-Step)
Learn how to make cowboy coffee with no bitterness and no grounds in your cup. The classic campfire coffee method with the exact ratio and technique.
Cowboy coffee has been a staple of American campfire culture for centuries — and lately it's gotten a bad reputation it doesn't deserve. People complain about bitterness, burnt coffee, and grounds in their cup. All of those problems come down to one thing: technique.
With a few small adjustments, anyone can make great black coffee over a campfire (or stove top) with nothing more than a pot and some grounds. No french press, no special adapters, no science lab required.
Quick method: Bring water to a boil, remove from heat for 45 seconds, add 2 tablespoons of coarse grounds per 8 oz of water, stir, wait 4 minutes, then settle grounds with a few drops of cold water before pouring slowly. That's it.
Here's the full step-by-step:
Gear Needed:
- Camping coffee pot
- Access to water
- Coffee cups
- Coffee grounds (fine or coarse are personal preference)
- Tablespoon or a way to measure (optional, but easier)
- Good gloves to handle the very hot pot
- Thermos (optional but will allow you to make more coffee that isn't bitter)
- Firewood

Step 1: Make a Fire.
Get a good fire going and get some good hot coals you can place you pot over to bring your water to a boil. Usually it is fairly easy to get the morning fire going with the coals from the previous nights fire.
Step 2: Measure Coffee and Water (2 tablespoons of coffee for every 8 oz of water)
Measure the amount of water you place in the pot or estimate. Obviously the more accurate you are with the the amount of water and amount of coffee you add will determine how strong or weak the coffee is. A good measure is 2 tablespoons for every 8 ounces, your Nalgene holds 32 ounces, so its easy to use for measuring. I've done it so many times there is a little coffee line inside my pot I just use as a reference. If you're not to picky about coffee taste, just eyeball it. But if you are with some coffee connoisseurs, then measure accurately.
Step 3: Bring your water to a boil.
Place your pot over the fire on a grill or some logs and wait for it to boil.
Step 4: Remove the pot from the fire - this is still an important step.
Once you have a rolling boil, immediately remove the pot from the fire and let it sit for about 30 seconds to a minute. If it is quite cold outside, 30 seconds is about right. During the warm summer you can let it cool a little longer. Coffee brews best just between 195-205 degrees. DON'T EVER ADD COFFEE TO BOILING WATER. This is the biggest mistake, and what gives coffee its bitter taste. Coffee added to boiling water will burn. Its drinkable, but it taste terrible.
Step 5: Adding Coffee Grounds
After about 45 seconds add your coffee grounds. Many people will swear by two different grounds to add. Some say add very fine grounds, and others say use very coarse grounds. I've done it both ways with very similar results, but I feel coarse grounds have worked a little better for me. The few times I've had a few little grounds in my cup is when I used fine grounds. Nothing crazy or off putting, but coffee with zero grounds is best.
Step 6: Stir in grounds and wait 2 mins
Stir the grounds in well, cover, and let the pot sit for 2 minutes. *It will work uncovered as well.
Step 7: Stir again and wait 2 mins
After the 2 minutes is up, stir the grounds again, because they will rise to the top as the coffee brews. Let the coffee sit for another 2 minutes.
Step 8: How to get rid of grounds.
This step is the most important step to keep grounds out of your coffee cup. The first option is the old trick to sprinkle a few drops of cold water into the pot. I usually just add some cold water in the palm of my hand and flick it into the pot. This will cool the grounds and make them sink to the bottom. It works fairly well, but not 100% every time.
The second option is to slightly tilt the pot towards the spout by placing a stick under the pot. Just an inch or two is enough. Wait for about 3-5 minutes. This will allow the coffee to cool slowly and the grounds will settle at the bottom, on the spout side of the pot.
Both work but based on the temperature outside, and how long you want your coffee to continue to brew will determine which method you use. The longer the grounds are in the coffee, the more of a chance for your coffee to be over cooked or bitter.
I prefer a combination of the two. A quick sprinkle of cold water and the tilt of the pot for a couple minutes. Test it out and find out what works best for you. You can practice on your stove top at home. Even though I've done this hundreds of times, sometimes little grounds still sneak in your cup.
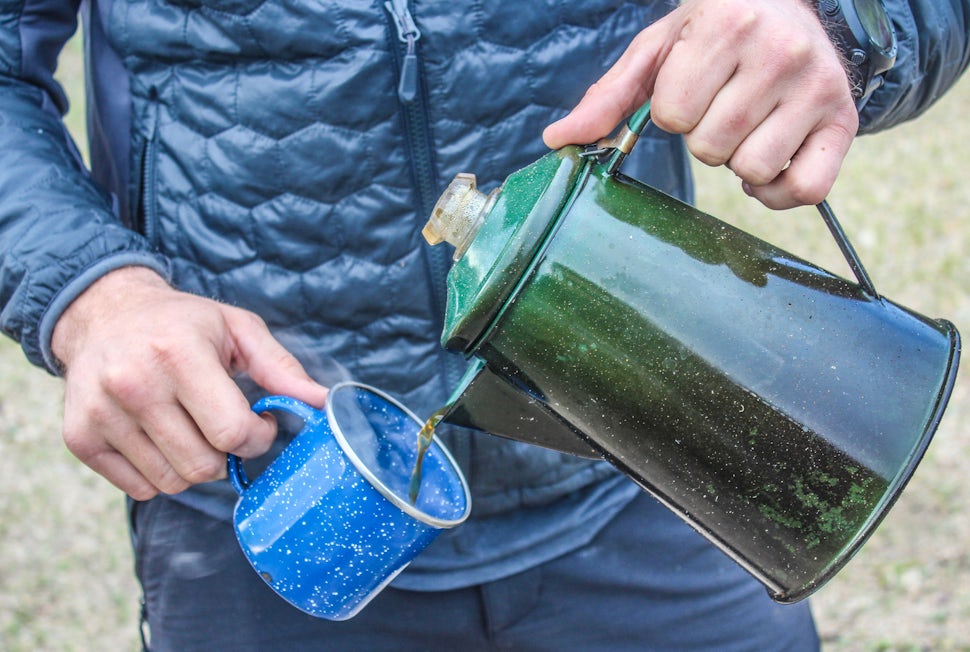
Step 9: Pour coffee slowly and remove from the grounds
Pour the coffee very slowly and try not to stir up the grounds you just worked so hard to keep out of your cup. Pour the remaining coffee in a thermos so it will remain hot but not continue to cook in the grounds.
Step 10: Enjoy this American tradition
Sit back and enjoy the natural and authentic way this American classic was suppose to be enjoyed. A simple old black cup of coffee that cowboys have been making while camping all across this great country.
Remember to try this method a couple times and don't get discouraged by some bad coffee at first. Although this method is very simple, it can go wrong very easily if your not use to it. Once you have it memorized, you will enjoy making Cowboy Coffee for your camping guests and they will love it more than the best latte on the market. Nothing is better than that warm cup of coffee on that cool mountain morning.
Cowboy Coffee FAQ
What is the cowboy coffee ratio?
Use 2 tablespoons of coffee grounds per 8 oz of water. A standard Nalgene holds 32 oz, so 8 tablespoons for a full bottle. Adjust to taste — more grounds for stronger coffee, less for lighter.
Can you make cowboy coffee on a stove?
Yes — cowboy coffee works great on a stove top at home. Use the same method: bring water to a boil, remove from heat for 45 seconds before adding grounds, then follow the same steps. It's actually easier to control temperature on a stove than over a campfire.
What coffee grounds should I use for cowboy coffee?
Coarse grounds work best — they settle to the bottom of the pot more easily and are less likely to end up in your cup. Fine grounds will also work but require more care when pouring. Either grind level produces good coffee as long as you don't add them to boiling water.
How long do you steep cowboy coffee?
4 minutes total — stir after the first 2 minutes, then let it sit for another 2. After that, settle the grounds with a few drops of cold water and let the pot tilt toward the spout for 3–5 minutes before pouring.
What's the difference between cowboy coffee and french press?
Both are immersion brewing methods where grounds steep directly in water. The main difference: a french press uses a plunger to physically separate the grounds, while cowboy coffee relies on the grounds settling naturally. Cowboy coffee requires no gear beyond a pot — which is exactly the point when you're camping.
We want to acknowledge and thank the past, present, and future generations of all Native Nations and Indigenous Peoples whose ancestral lands we travel, explore, and play on. Always practice Leave No Trace ethics on your adventures and follow local regulations. Please explore responsibly!
Do you love the outdoors?
Yep, us too. That's why we send you the best local adventures, stories, and expert advice, right to your inbox.


