
How to Take Long Exposure Photographs at High Noon
Shooting long exposures in the daylight is simple - it just requires a robust little system.
I think a good caveat to begin this type of post, as with most things photography related(!), is that there are so many ways to achieve the same, or similar, results in the photo world. From the type of camera and lens you use, to your preferred exposure settings (ISO, aperture, shutter speed), to the way you post-process – there is no one unique or right way to find ‘that look.’ Because at the end of the day, that look is your look, and the ones you like best are just that – the ones you like best. So (duh) I’d encourage y’all to keep experimenting – keep taking photos, keep learning from others, and you’ll find your lane!
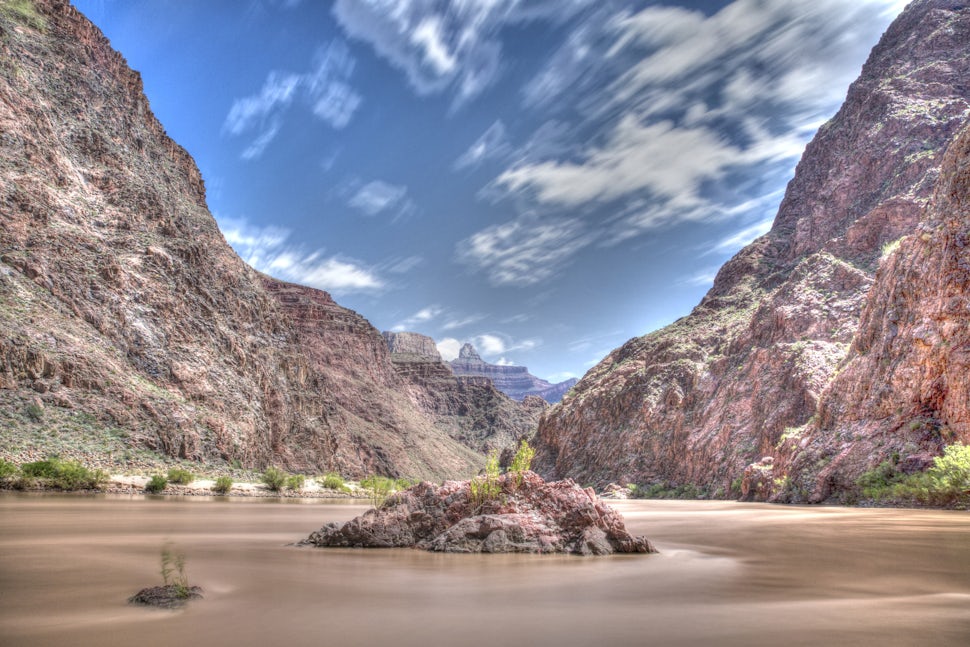
Now...with that said, I took a trip (fairly) recently to the Grand Canyon with a couple of my hombres, where I took some of the photos you see in the thumbnail/headline of this post (and throughout this Story). To capture the movement of the clouds, I took a 'long exposure' photograph, which, if you don't know (this Story is for all levels of photographers) involves using a long-duration shutter speed to sharply capture the stationary elements of images while blurring, smearing, or obscuring the moving elements (Thanks, Wikipedia - seriously, you're the best). Basically, a long exposure photograph captures the passing of time, and to me, is really anything that requires the use of a tripod. A ubiquitous rule of thumb in photography is that, in order to avoid camera shake, the slowest shutter speed you should really be shooting is 1/focal length. For example, if I've got my camera/lens (my go-to lens has a range of 24-70mm), and I zoom all the way in (70mm), the slowest shutter speed I could reasonably shoot on without producing a blurry image is 1/70 (a.k.a one-seventieth of a second). Anything under that (i.e. slower), say 1/30 or 1/15 of a second, should be mounted on a tripod for best results. I think the slowest/lowest shutter speed I've successfully shot a sharp photograph (without panning) is in the neighborhood of 1/15.
A key tool to photographing long exposures in the daylight is a neutral density filter. If you think about exposure length as the amount of light that is being let into the camera for processing, it would make sense that by darkening the lens/using an ND filter, you are able to allow your camera to keep its shutter open longer...right? That's what makes a photograph a long exposure. And that's why a lot of long exposures you'll see are taken at night, when there is less light, and ambient illumination levels are provided by street lights, lampposts, signage, traffic, etc., like this one I shot DTLA a few weeks ago (without an ND filter, naturally).

By using an ND filter, you can basically 'trick' your camera into believing it's dark, allowing you to keep your shutter open for longer and to capture movement, etc. (this is also why you should set up and focus your camera before attaching the ND filter to your lens, as described below). Personally, I always bring ND (neutral density) filters (at least one for each of my lenses), especially if I know I might post up during the day at snack time/lunchtime or whatever to try and get some shots. Also, a tripod. I pretty much just always bring a tripod. For shorter/day trips, consider a tripod that is smaller and packs more easily – the ones with malleable/flexible rubber legs are good (just don’t buy them cheap, I think you’ll regret it - also, be mindful of the size of your camera as it relates to the size of the tripod...I've seen some fairly awkward set ups with large telephoto lenses and mini ~ 8" tripods that just don't look right)– especially if you need to move a good distance. Otherwise, just take your main tripod, or whatever you've got (Dude, I've balanced my camera on a stack of rocks and duct taped the shutter down with a rock to make this work before; janky can be less-preferred, but you gotta do what you gotta do, and janky is also synonymous with resourceful! I know, photography can get expensive - QUICKLY).
We hiked down to the Colorado River about 12 miles from the South Rim, and we posted up for a little break before turning around to blitz our way back up the canyon. Leaving at 6 AM and getting to the river at about noon left for perfect lighting conditions with the use of an ND filter. If you know a thing about natural light, you’ll likely know that it isn’t usually the best around high noon with an overhead sun…just because it’s so dang bright. But that’s the thing I really like about photography, you kinda just get what you get, (conditions-wise), and then what you do behind the lens is really up to you.
As mentioned, I usually bring an ND filter or two for each lens…since I knew that most of these photos would be landscape(ish) and, therefore, suited to a lens with a shorter focal length (and because of weight/limited bag space), I just brought along my Canon EF 24-70mm f/2.8L II USM Standard Zoom Lens. I had two filters, a (super handy) variable ND filter that can be adjusted (i.e. you can twist the lens cover to adjust for varying levels of brightness and/or darkness) and a ND (3.0) that allows you to capture up to 10 additional stops of light. I went with the latter. I mounted the camera to the tripod and set an autofocus point before switching to manual focus. Normally, I would stick with a standard aperture (f16 is pretty standard for sunny, day light conditions) to capture a good depth of field(DoF)/range of detail, but after a few test shots, I decided to bump up to an f22. (If you're new to depth of field, spend a minute with the previous link - If you think of DoF as a football field, a shallow depth of field (typically lower apertures such as f2.8/5.6 a.k.a larger lens diameter) would provide crisp detail for say 10-20 yards of the total 120, whereas higher apertures (f16/22 and up) would capture the same level of detail, though from goal line to goal line (100/120 yards) - generally, photos that have a crisp subject and a blurry background are shot at lower apertures, like this bokeh photo I shot some time ago).

Given the brightness, focal length (24mm), and sticking with an ISO 125 (I wanted a crisp image), I wanted to be able to max out on my exposure length to capture what really got my attention – the movement of the clouds. Check out the Lightroom readout (below), which shows the in-camera settings and histogram (which is the graph whose readout basically shows you how bright your brightest highlights are and, conversely, how dark your shadows - you can see where I blew out the highlights a bit...20/25 seconds probably would've been the truest/best exposure for the lighting conditions).

Once I’d switched to manual focus, I slapped on the filter and started with some test shots with varying exposure lengths. Patience is key here. Also, I’d recommend checking your playback under a towel or some natural cornice/shaded overhanging so you can get a better sense of how well-exposed the image is (OR ISN’T). 30 seconds ended up being the optimal exposure for my taste. And even though I shoot RAW (a.k.a. I can control exposure and brightness while post-processing - you can do this without shooting RAW, too...however, technically, if you shoot .jpeg or a similar format, the camera will automatically process the image in-house, so its somewhat adultered by the time you import it to your editing software on your laptop/desktop), once I find an exposure I like, I tend to bracket it with one or two stops of exposure in both directions, just to give me maximum editing options. A LOT of people don't do this, for any number of reasons...but many don't do so simply because you don't have to spend as much time in the editing bay. Another way to achieve similar results? Welp, you could shoot a photograph, metering for the highlights/brightest places in your image, and adjust the exposure/brightness of your photo afterwards for up to 4ish stops of light without introducing noise. For example, if it's high noon, you'd press the shutter halfway (in autofocus) while facing the sun (careful...the sun can damage your camera's sensors...but I do it all the time), and then frame your image before pressing the shutter all the way down. You'll have a really dark image that should have most of the image's detail, which, as mentioned, can be adjusted in post. By boosting the exposure/brightness, you can still capture a large range of detail without reducing image quality. Just food for thought. As always, player's choice.
So a week or so later, since I don't mind the editing bay, I reviewed the shots I’d taken. Most of them looked good as they were! But I wanted to really emphasize the drama of the moving clouds to get an extra dynamic image, so I took the properly exposed image, an (intentionally) underexposed image and an (intentionally) overexposed image and loaded them into a stack in Photoshop. To get a sense of bracketing and intentionally over/underexposed images, see wearesophoto.com's image below.

Once in Photoshop, I changed the blending layers, and using layer masks, painted in areas of the image that lacked detail. After I was satisfied, I flattened the layers into one image and made some final touches by pulling on the shadows and highlights to create an overall composition that I thought was saucy.
Have fun shooting! Feel free to reach out if you have any questions on my process and whatnot! Big ups! And journey well.
We want to acknowledge and thank the past, present, and future generations of all Native Nations and Indigenous Peoples whose ancestral lands we travel, explore, and play on. Always practice Leave No Trace ethics on your adventures and follow local regulations. Please explore responsibly!
Do you love the outdoors?
Yep, us too. That's why we send you the best local adventures, stories, and expert advice, right to your inbox.


