
Havasu How To
Everything you need to know to make the most of your next adventure to Havasu Falls
So you are convinced that you are going to Havasu Falls this year (if you're not, check out my previous article on Havasu), but despite your researching, you still have a lot of questions. Fear not, I was in the same boat last year, and here is everything you need to know.
This will cover: how to get a permit, costs, how to get there, when to get there, what to bring, what not to bring, where to go, what to do, and other tips and tricks.
You might be wondering why I'm writing about this in the dead of winter, after all prime time Havasu weather doesn't start for another 4-5 months. Well if you plan on going, you need to start right MEOW. This is because the permit window for the year opens February 1st, and it will be a hell of an obstacle to get past.
Permits: *Read this part, it is the most important*
Perhaps the best way to get across the magnitude of how difficult this is, is with a personal recount of my experience: Flash back to the day I got through, it's two weeks into calling, with roughly 300-500 calls a day. If you do the math, that's roughly 5,000 calls. Yet I remained patient and unrelenting. By this point it was what I did during my free time. Lunch break, the drive to work, watching tv, you name it. Cycling through those 4 phone lines in my recent calls became subconscious and second nature. Finally the fateful day came, I'm on my way to work and I got through to an actual ring tone! and it rang, and rang, and rang... until finally my call dropped... *Deep Breath*. A few minutes later and another ring tone! Except this time they hang up on me. Ughhh you cat to be kitten me! Nevertheless I continue my efforts, and as I pull into work I finally get through! By this time I feared my dates were going to be all taken, and I was almost right. Two weeks in, and with the exception of a few gaps, everything was completely booked until September. With a little flexibility on the dates, I managed to fill one of these gaps with my small party size.
What To Take Away From This:
- Seriously the most tedious and frustrating thing you might ever undertake.
- The system for reserving a permit is archaic and inefficient. You have 4 phone lines to choose from. If there's already a caller on the line, you can't leave a message, you are greeted with a busy tone, which you better become friends with. You and that busy tone will get to know each other intimately.
- Be patient, diligent, and unrelenting
- Have your party size and desired dates available. Plan for backup dates and flexibility, you may not get exactly what you want.
- Even if you plan on visiting in September, make that reservation as soon as the permit window opens Feb 1st
- Be nice to the person on the phone, it's not their fault, and they will work with you if you're pleasant to deal with.
Getting There
One of the biggest mistakes I made was thinking we could camp at the trail head the night before, which technically you sort of can, but you don't want to unless you don't mind sleeping in your car. The parking area is also the trail head. It is on the rim of the canyon so it is VERY exposed, which leads to high winds. Cars take up 95% of the area, and the ground is also 99% gravel and rock. We found an area about a mile back up the road, albeit still highly exposed. Not to mention you run the risk of being trampled by a herd of jackasses (literally) at about 3 o'clock in the morning.
- Sleep at the parking area/trail head if you can car camp.
- I you want to tent camp, try to find a pull off in the desert before you start descending into the canyon.
- Try to arrive and start hiking by at least 7 o'clock - that will insure you have cool weather, plenty of time to enjoy the day, and get the best pick from the campsites.
- Coming from Flagstaff, it was about a 3 hour drive in total.
- Fill up on water beforehand
Rules
- No dogs allowed
- No campfires
- No alcohol
- No drones (I saw otherwise)
- Pack in pack out
The Hike In
- 12 miles total - takes approx 6 hours at a moderate pace.
- 10 miles to the village of Supai (water and food available there)
- 2 miles from Supai to campgrounds
- Approx the last 3 miles involves hiking in loose/deep sand.
- Permit holder will check in at a hut on your left once you enter the village. Permit holder needs ID and form of payment (cash or card) to claim permits for the party.
Costs
- $35 entry fee per person
- $17 camping fee per person per night
- $5 enivronmental care fee per person
- All fees subject to 10% tax
- You can wimp out and pay $75 (one way) to $150 (round trip) for a pack mule to carry your gear.
Choosing Camp
- Spots are first come first serve. There are no designated sites. You can pitch your tent or hang a hammock in any acceptable spot.
- Campground is .5 miles long - Take your time and hike all the way through to find the best camp. My favorite camp areas were at the very end. I think we got the best area in Havasu, located right on top of Mooney Falls.
- It's a free for all - we moved camp 3 times before we found the perfect one. People leave every day, so wake up early and take a stroll to see whats opened up.
- There are hundreds of trees that line the riverbank, each one as good for a hammock as the last.
- Even though lots of people visit, camp isn't a circus like I expected, you can find your own space away from crowd without much trouble.
Where To Go?
You will be so stoked upon first getting there that it will be hard to decide on where to start. If you started the hike in early as suggested, here is an ideal breakdown of how to tackle all that is Havasu.
- Day 1
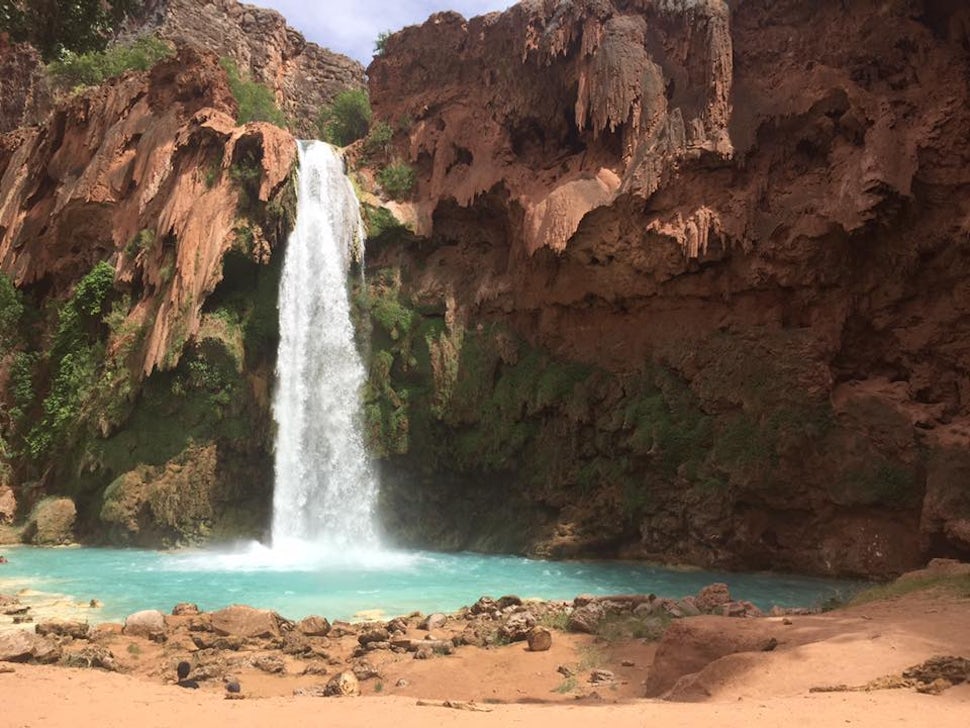
- I recommend doing a nice stroll up to Havasu Falls, if there is a crowd there, continue on about a mile back up to Little Navajo Falls, then hopefully the crowds have cleared on your way back.
- Enjoy the cascading pools above Little Navajo.
- There's a nice little spot to jump off the falls (approx 20ft) to start your cliff jumping experience.
- Follow the social trail about a half mile further upstream from Little Navajo and you will find an unseen set of falls that you hiked right past on your way in.
- Day 2
- Head down The Chains to relax at Mooney Falls to start the day.
- Facing away from Mooney Falls, there's another small set of falls just away and to your right with a nice little rope swing to engage in shenanigans with.
- Once you've had your fill, make the trek down to Beaver Falls.
- Approx 8 miles round trip
- Bring plenty of snacks and water
- You will encounter a few small cliff jumping opportunities along the way
- Bring your camera, the trail is beautiful
- Trail traverses several unstable river crossings and climbs up/down several sections of rock face
- Once there, the highest cliff jump in Havasu (ranges between 40-60 feet) is located about a quarter mile further downstream.
- It's a super sketchy rope climb to get back up, use caution. Better yet, bring a new rope to replace that old frayed one before someone kills (figuratively) themselves.
- Day 3
- You've now hiked the expanse of Havasu, and seen all of the major falls. Use this day to relax and explore. Venture off the beaten path and discover the hidden gems of the area. This is how we found the hidden falls with the cliff jump, which rivals the one at Beaver Falls, as well as the secret cave, which is behind a different set of falls entirely.
- The hidden cliff jump is located between Havasu falls and Little Navajo. You can hardly see it from the trail, which sits high above the location. There's an area with warning signs that mark unstable ground. Do not walk there of course, but the cliff is located near this, way down on the opposite bank. Once you know the spot, use good sense when getting down there.
- Other than that, get lost with your camera and enjoy the day.
- Day 4 (optional)
- Most people did not spend more than 3 days there. You can definitely accomplish everything within this time frame. But if you are there for longer, and if you are looking for an adventure, the one thing I did not get to do while I was there was make the journey down to the confluence of the Colorado River and Havasu Creek.
- 16 miles round trip from the campgrounds.
Pack List? Subject to time of year you visit and personal preference. I'll spare the obvious. Judge accordingly.
- Dates in Havasu were May 21st - 25th. Hammock camping with a 50 degree bag (no pad) was borderline. Add a warmer bag, pad, or other increase in insulation and it would have been perfect.
- Brought tents along just in case. 50 degree bag and a lightweight pad with an R value of 0.7 was perfect.
- #1 most used item - Sunglasses. A nice pair of polarized glasses will make everything much more enjoyable. Will shield your eyes from the sand (a biggie) and the sun.
- #2 most used item - Necker/gaiter. One of the most overlooked and versatile items I never leave home without. Protects from the sand and the sun. Cool off if its hot by getting it wet. Most are microfiber and can be used to clean camera lenses and sunglasses
- #3 most used item - Sandals. A $25 pair of Teva's worked beautifully
- Other Essential Wearables:
- Trail runners/hiking shoes, safari hat, sunscreen, quick drying shorts, lightweight long sleeve base layer (for cool nights & sun protection), socks.
- Essential Tech Items:
- GoPro Hero 4 or 5 w/floaty back door, stick, and portable tripod - The Hero 4/5 are capable of long exposure night photography.
- Solar Powerbank - One of our most used items. Our group relied on it to power our tech. Sun is very plentiful.
- Solar Inflatable Light - Waterproof, lightweight, efficient, and affordable ($25). Used every night. I recommend the Mpowered Luci Color.
- Headlamp - Invest in a good lamp. Don't want it cutting out on you while you descend down the chains to Mooney Falls in the middle of the night.
- Misc Essentials:
- Paracord - Very versatile, and 100% necessary to keep your food/gear squirrel free.
- First Aid Kit - There's plenty of opportunity for cuts, scrapes, and bruises. Come prepared.
- Lightweight Towel - Get one of those fancy towels that can absorb 16x its own weight ($20). Easy to pack, easy to use.
- Goggles - Very useful for finding dropped items (GoPro and glasses), and makes exploring a lot more fun.
Other Information You Should Know
- The squirrels are destructive and devious masterminds that will stop at nothing to steal your food.
- Seriously, they chewed through my brand new tent to retrieve a granola bar, they chewed through the paracord we used to hang our food, a steel wire cage for food storage, and they ruined hundreds of $$$ of our neighbors gear.
- Come prepared with paracord. Hang your food properly. Collaborate with your camp neighbors to watch each others camp when away. Bear canister would also work.
- We depth checked each cliff jump in Havasu. Each one was more than safe w/depths up to 30 feet.
- There is a fresh spring that provides sanitary drinking water at the campground.
- You will want to filter the water from the river.
- Only time we had to filter was during the long trek to Beaver Falls
- Weather experienced during May 21st was low to mid 50s at night and mid 70s to low 80s during the day.
- Nights were clear - Had no need for a rain fly
- Water temparture is around 72 degrees year round
- The horses/mules ALWAYS have right away
- Even when trying to avoid them, I got body checked against the canyon wall by a horse
- Monsoon season is July - early September, avoid it if possible.
- Visit now, the immense popularity and the subject of the area to flash floods means that the area could soon change or access might become more restricted.
- Example: A flash flood in 2008 changed the course of the river and altered beaver falls and havasu falls.
- The tribe has a hard time accommodating the already limited amount of visitors they let in each year
- There is a store in Supai to restock supplies.
- Prices are at least 4x normal. Expect to pay a lot for a little.
We want to acknowledge and thank the past, present, and future generations of all Native Nations and Indigenous Peoples whose ancestral lands we travel, explore, and play on. Always practice Leave No Trace ethics on your adventures and follow local regulations. Please explore responsibly!
Do you love the outdoors?
Yep, us too. That's why we send you the best local adventures, stories, and expert advice, right to your inbox.


